Kornerspot Vendor Onboarding Guide – From Registration to Running Your Programs
Kornerspot Vendor Onboarding Guide
From Registration to Running Your Programs
This guide is designed to take you from a standard user through to being a fully operational Vendor on the Kornerspot platform. Follow these steps to begin creating your own affiliate programs, recruiting affiliates, and generating sales.
Understanding Your Role: What Is a Vendor?
Before you begin, it is important to understand the definition of a Vendor within the Kornerspot ecosystem.
Definition: A Vendor is a specific user type that has been granted special access levels by the Kornerspot Admin.
Key Responsibilities & Distinctions:
- Affiliate vs. Vendor: Unlike a standard affiliate (who earns commission by promoting programs created by others), a Vendor creates their own programs and products.
- Recruitment: Vendors offer their own programs for affiliates to sign up and promote.
- Earnings: Affiliates earn commissions from sales, and the Vendor earns the remaining value of the sale after the affiliate commission has been paid out.
- Dual Access: Vendors can still participate as affiliates. They have access to both affiliate and vendor panels.
Onboarding Phase 1: Registration and Setup
Accessing the Vendor panel requires registration and explicit admin approval.
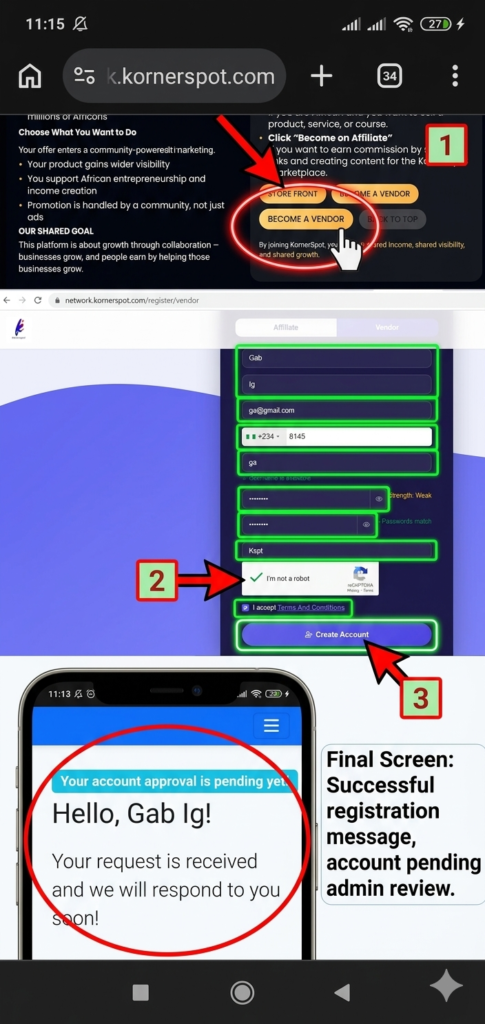
Step 1: Complete Standard Registration
Every vendor journey begins with a standard user registration on the main platform.
- Action: Visit https://www.kornerspot.co.uk/.
- Action: Scroll down and choose the BECOME A VENDOR option.
- Action: Fill in the registration form completely and submit.
Step 2: Await Vendor Access Approval
Vendor access is not automatically granted upon registration. You must wait for verification.
- Process: Access must be manually enabled by the Kornerspot Admin.
- Outcome: Once your access is enabled, a new Vendor Panel section will appear within your main dashboard, providing all vendor-specific tools.
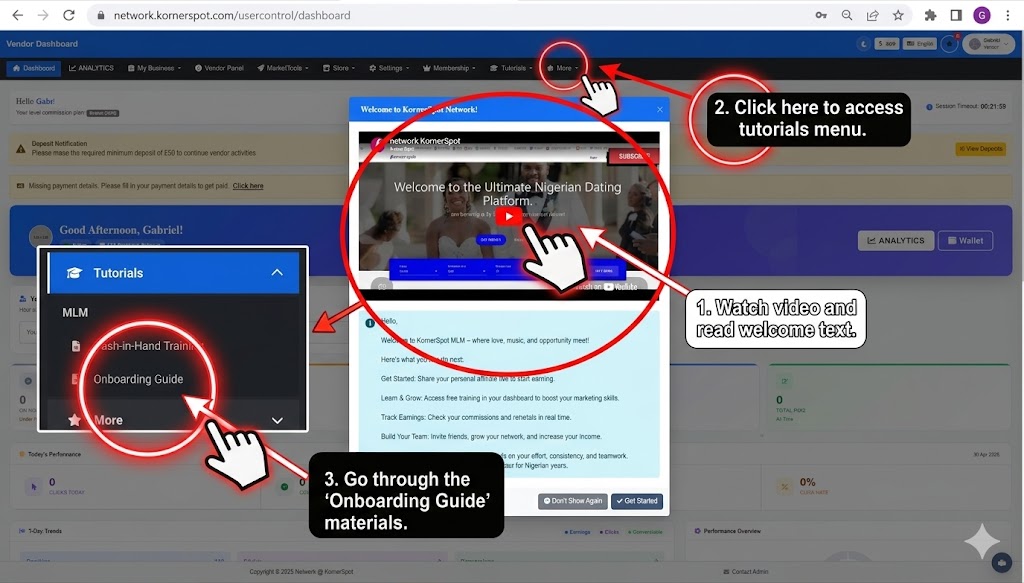
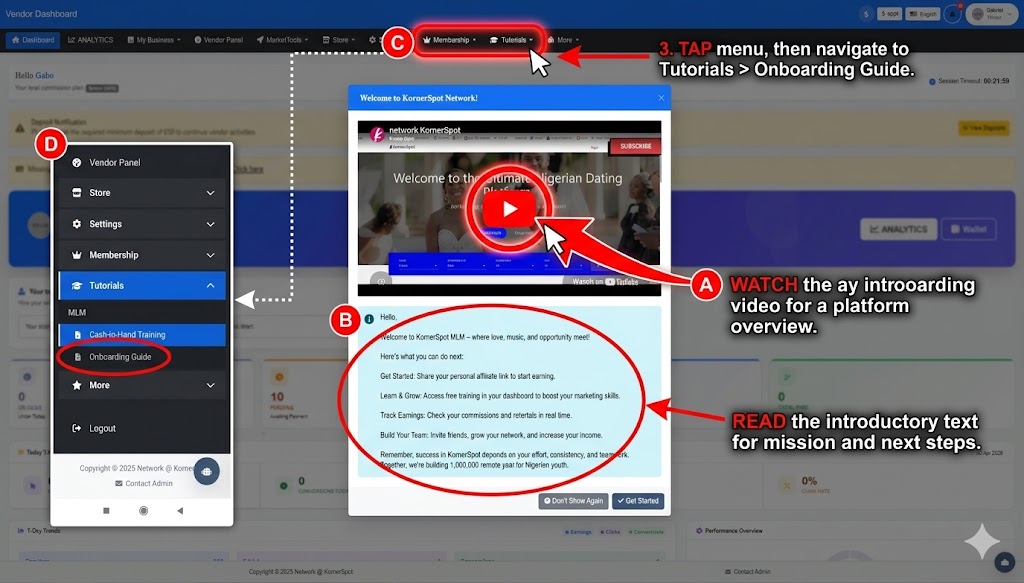
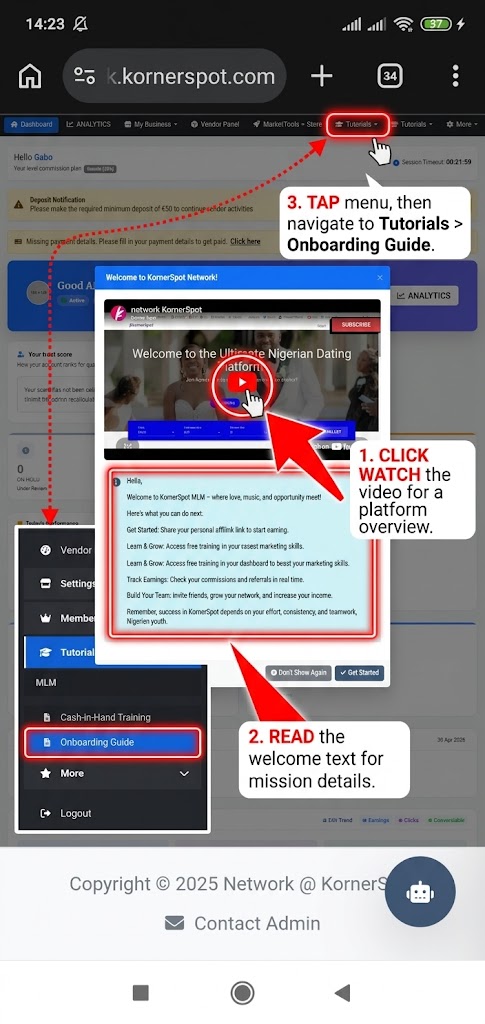
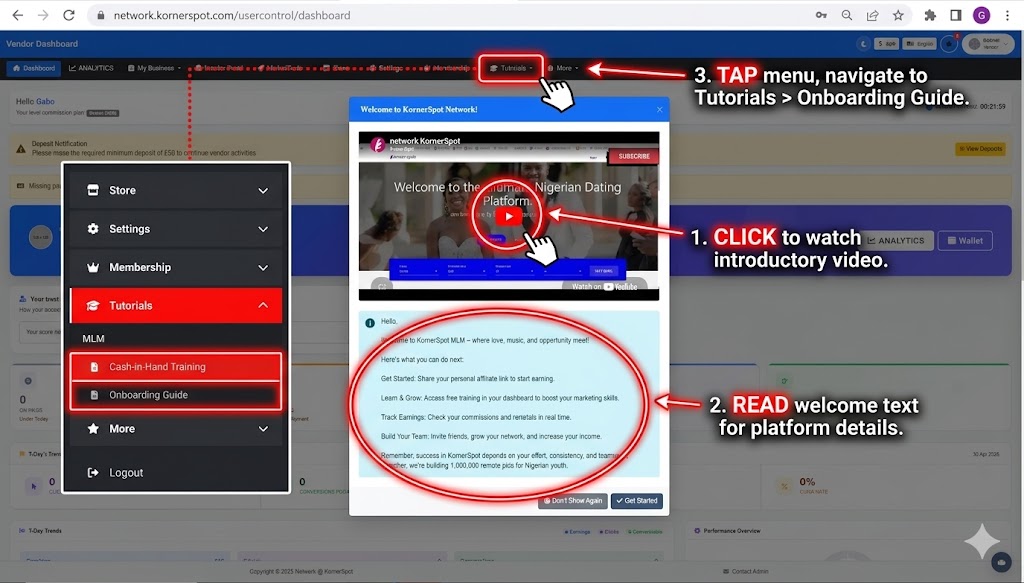
Step 3: Familiarize Yourself with the Vendor Dashboard
After approval, log in and navigate to the newly visible Vendor Panel.
First take your time to
- Watch the introductory video and go through the introductory text.
- Tap the menu bar, expand tutorials, and familiarize yourself with the materials in the onboarding guide.
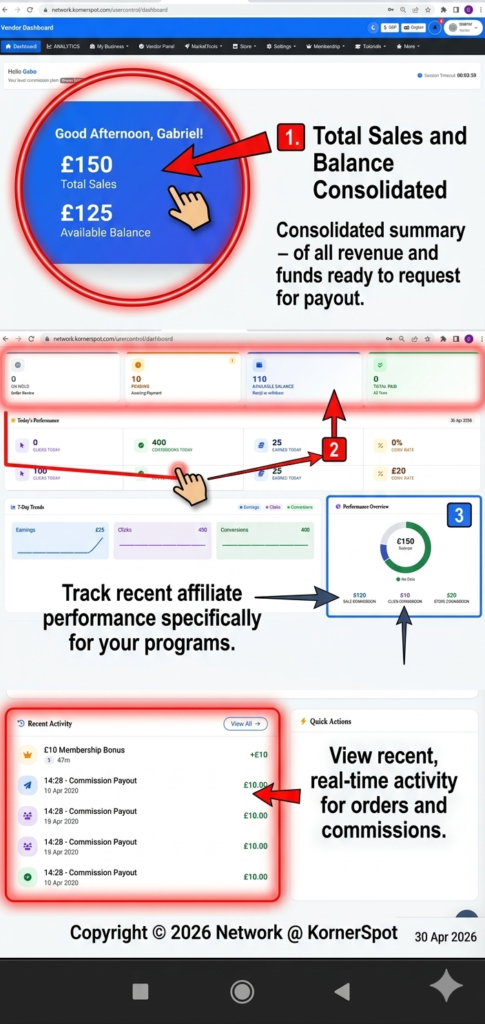
Next, go back to your dashboard and take a moment to understand the key metrics displayed:
- Wallet Balance and Deposit Balance: Your currently available and deposited funds.
- Total Sales: The total revenue generated from all your programs.
- Affiliate Activity: Clicks and sales data tied specifically to your programs.
- Recent Activity: Orders and commission payouts.
Step 4: Making Fund Deposits
The screenshots below illustrate the steps to fund your vendor account.
- On the deposit notification on the dashboard, Click view Deposits Button
- Click Deposit Now
- Choose payment method e.g Bank Transfer
- Choose bank and make payment using the account details displayed
- Attach payment proof and click Confirm
OR
- If you’re using Stripe, enter amount to deposit (50 pounds) and your card details
- Click submit payment.

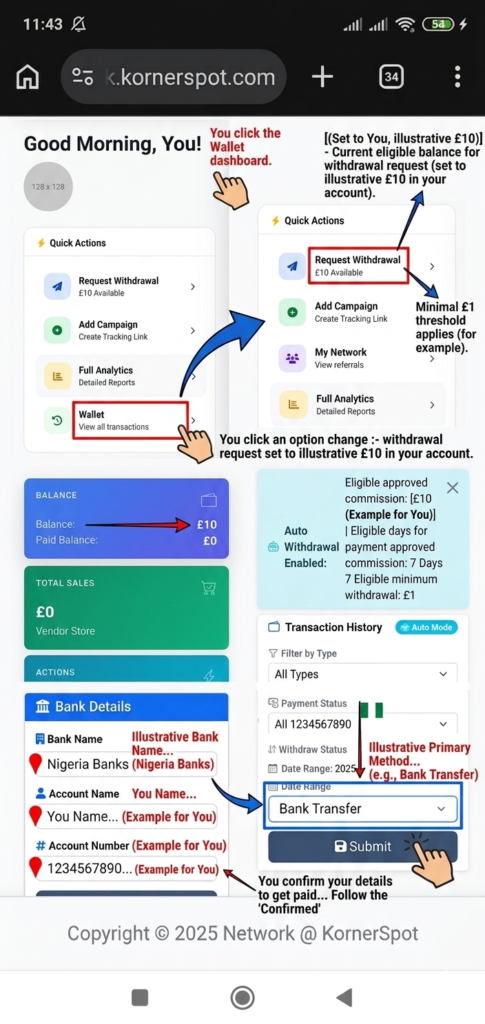
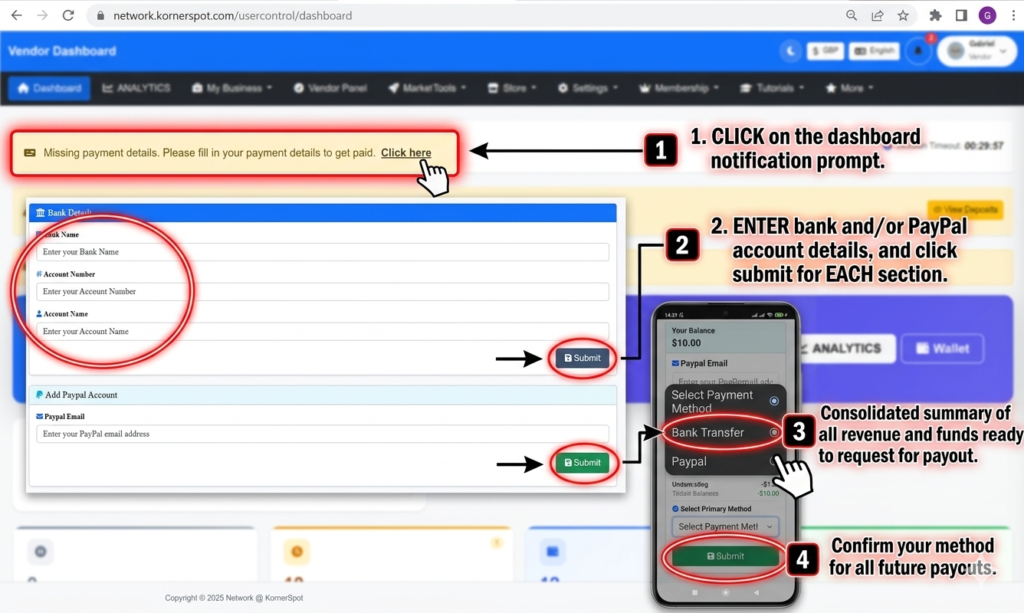
Step 5: Adding Payment Details
The screenshots below illustrate the steps to add your payment details.
- You can begin by clicking the click here prompt on the notification on your dashboard
- Enter bank details, and/or Paypal account details and click submit
- Choose primary payment method
- Click submit
Onboarding Phase 2: Building Your Programs
This phase covers how to create the fundamental offer that affiliates will promote.
Understand the Structure of an Affiliate Program
Before creating your first program, ensure you understand the components that make up the offer.
Definition: A Program is the explicit affiliate offer you are presenting to the network.
What a Program Defines:
- What product or service affiliates are promoting.
- What commission affiliates earn (per sale or per click).
- The Target URL where traffic is directed.
Key Requirements:
- Vendors may create one or multiple programs.
- Each program is mandatory to be reviewed and approved by the Admin before it becomes visible to affiliates.
Step 6: Follow the Step-by-Step Program Creation Flow
- Action: Log in to your user panel.
- Action: In the top navigation bar, click MarketTools to open the dropdown menu.
- Action: Under the Campaigns section, click Programs.
- Note: This page displays all existing programs. It will be empty until you add your first one.
- Action: Click the Add New button (top-right corner).
- Action: The creation form will open. Fill in the required fields:
- Program Name: Enter a clear, professional name (e.g., “Summer Sale Promotion”).
- System Note: The ‘Admin Commission’ section is read-only. It displays the click and/or sale fees the Admin earns from this program (set by the Admin).
- Action: Click on Advanced Settings.
- Action: Choose your structure:
- Action: Select Product Commission Type (e.g., Fixed, Percentage).
- Action: Enter the Commission Rate (the amount the affiliate earns).
- Action: Enter the Target URL (the landing page for traffic).
- Action: Click the Save button at the bottom of the form.
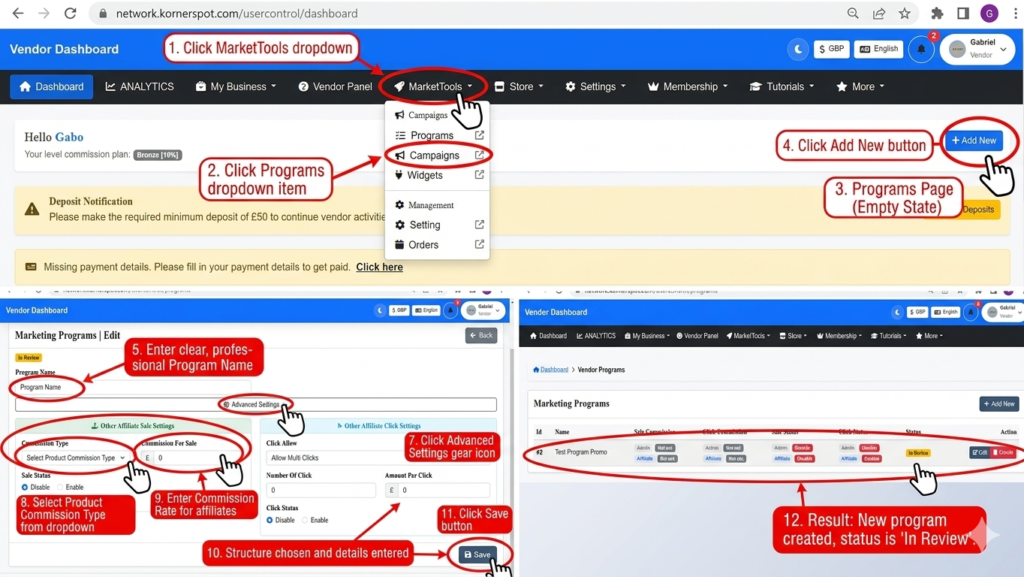
Step 7: Navigate the Admin Review Process
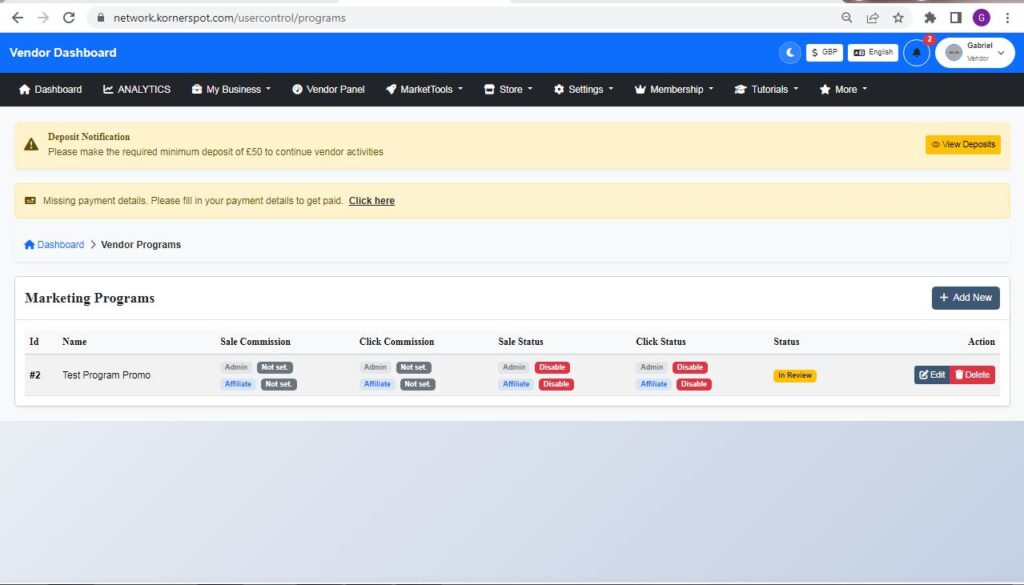
- Process: After saving, your program will have the status In Review.
- Outcome 1 (Hidden): The program is not visible to affiliates while in review. The Admin receives a review notification.
- Outcome 2 (Visible): Once the Admin updates the status to Approved, the program becomes visible to affiliates.
- Note: Affiliates will not start promoting immediately after creation. Promotion only begins after Admin approval. Review time varies.
Next Steps After Program Approval
Once your program status changes to Approved:
- The program becomes visible to affiliates in their available Programs list.
- Affiliates can instantly generate their unique tracking link.
- Crucial Next Step: After approval, you should immediately create Campaigns (creative assets like banners and links) to support your approved Program.
Onboarding Phase 3: Developing Promotional Assets
High-quality creative assets (Campaigns) are essential for motivating affiliates.
Understand the Role of Campaigns
Do not rely solely on affiliates sharing a plain tracking URL. Campaigns give affiliates professional, ready-made marketing materials.
Key Principles:
- Campaigns are linked directly to approved Programs.
- Ready-made assets increase conversion rates and make your program more attractive to top-performing affiliates.
Step 8: Choose and Create Campaign Types
There are four types of assets you can create for your programs.
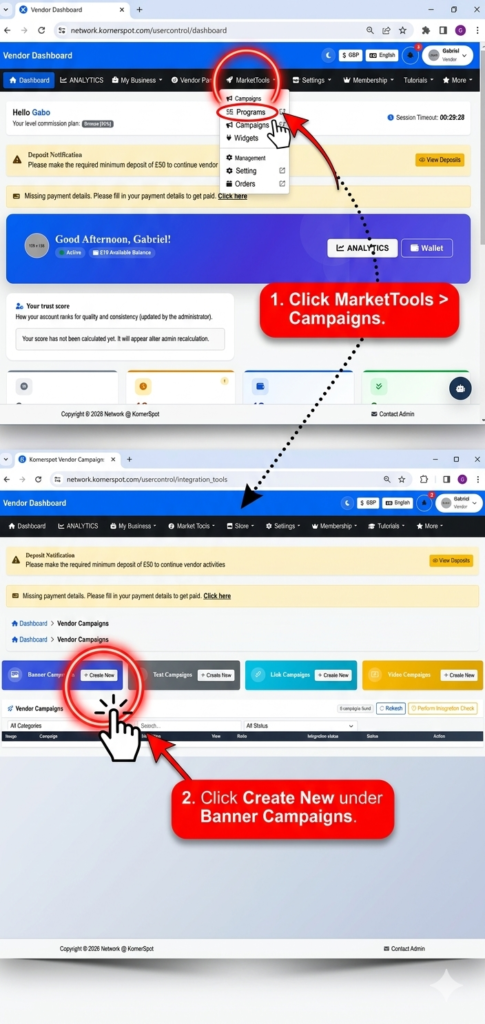
To Create Any Asset, Go to the Campaigns Page:
- Action: Log in to your user panel.
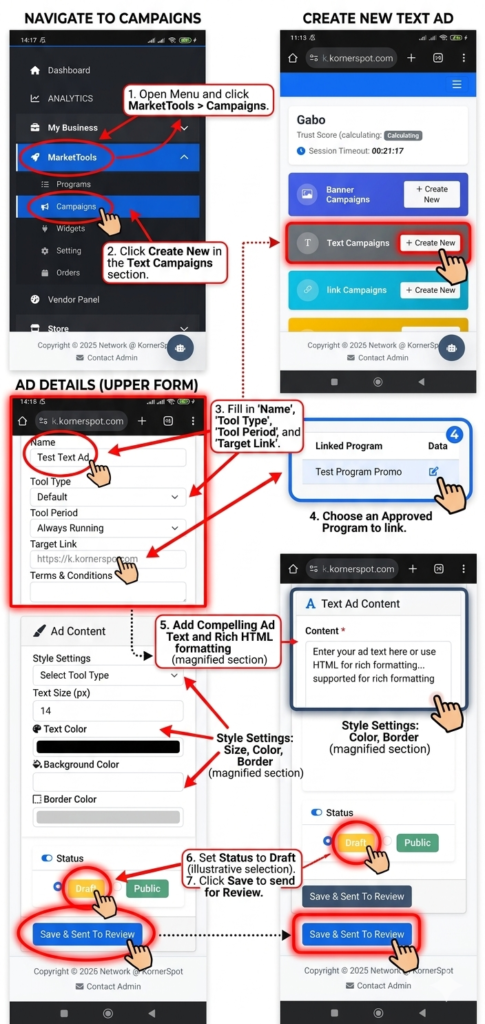
- Action: In the top navigation bar, click MarketTools > Campaigns.
Follow the Step-by-Step Flow for Each Type:
| Asset Type | Action | How to Create |
| Banners | Image-based ads affiliates embed on websites. |
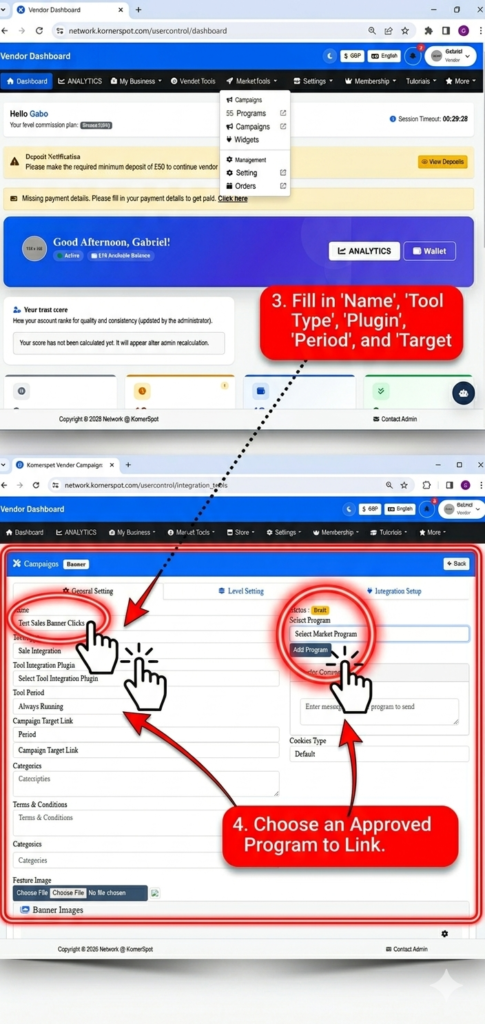
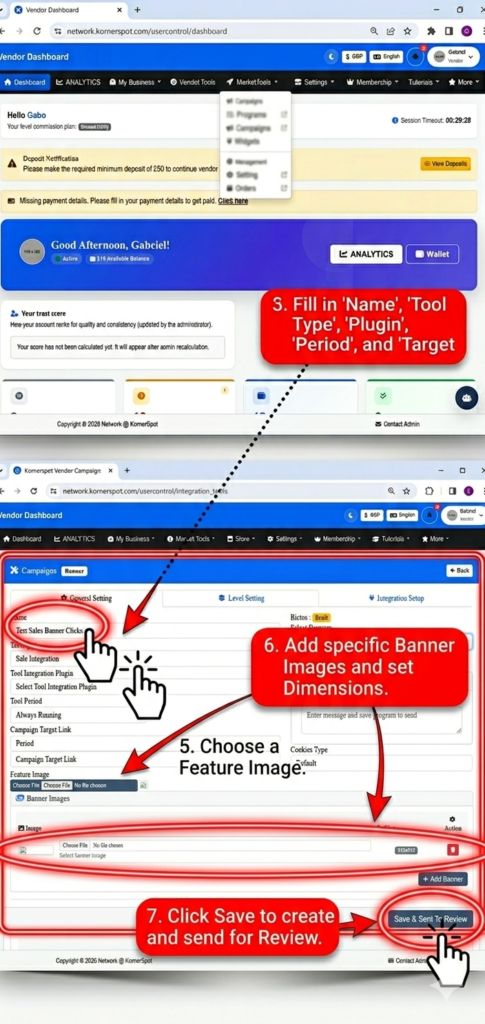
Action: Click Create New > Banners. Action: Fill in required fields: Name, Tool Type, Tool Integration Plugin, Tool Period, Campaign Target Link, Banner Image, Dimensions, and the Program it is linked to. Action: Save. |
| Text Ads | Headline and description links. | Action: Click Create New under the link campaigns tab.
Action: Click Text Ads. Action: Fill in the headline, description, and the program it promotes. Action: Save. |
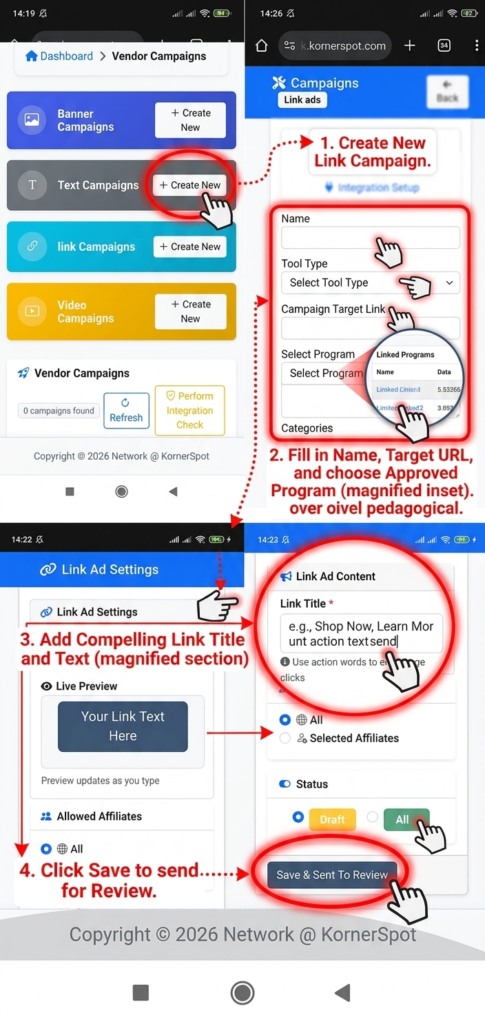
| Invisible Links | Clean, direct tracking links (no visual elements). |
Action: Click Create New > Invisible Links. Action: Enter the destination URL. Action: Link to the relevant program. Action: Save. (Affiliates use this link directly.) |
| Viral Videos | Video-based promotional assets. | Action: Click Create New > Viral Videos.
Action: Enter video details. Action: Link to the relevant program. Action: Save. |
For creating banners:
 For creating text ads
For creating invisible links/link ads
For creating viral videos/video ads

Phase 4: Running Operations and Earning
Once your programs are live and your assets are ready, operations begin.
Affiliate Promotion and Tracking
The recruitment and promotion lifecycle now runs automatically:
- Affiliates join your program.
- They instantly access the campaign assets (banners, text ads, etc.) from their Campaign page.
- Automatic Pairing: Each asset is automatically paired with that affiliate’s unique tracking code, ensuring accurate conversion tracking for both you and them.
Understanding Sales, the Commission Split, and MLM
This is how funds are distributed when a sale occurs through an affiliate’s tracking link.
Standard Sale Distribution Flow:
- Sale Record: The system records the sale and applies the commission rate set on the program.
- Affiliate Payout: The affiliate instantly receives their specified commission into their wallet.
- Vendor Payout: You (the Vendor) receive the remaining value of the sale (Sale Price minus Affiliate Commission) into your vendor wallet.
- Note: The Admin may also take a platform fee based on the configuration of the commission structure.
Advanced Commission Structure: MLM (Multi-Level Marketing) It is important to understand how MLM may affect your program’s structure.
- Definition: MLM allows affiliates to earn not just from their own direct sales, but also from the activity of affiliates they have recruited (downline).
- How it Works: Affiliate A refers Affiliate B. If Affiliate B generates a sale for your campaign, Affiliate A earns a commission based on B’s activity.
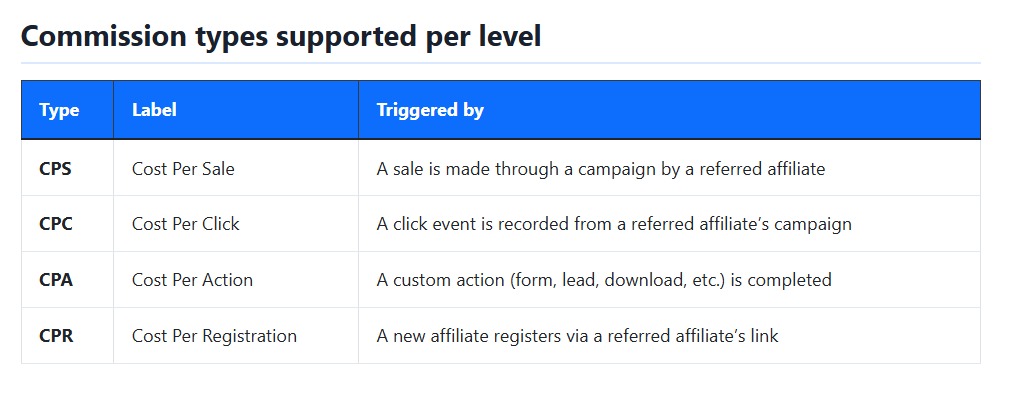
- Configurations: The Admin controls all MLM variables, including:
- Number of levels (1 to 20).
- The commission rate at each level.
- Supported event triggers.
- Application to Vendors: The Admin’s global MLM settings apply to all campaigns on the platform, including campaigns created by you (the Vendor).
Vendors can also create Integration Tools (banners, embed codes, widgets) for affiliates to use when promoting their programs. These are managed in the Campaigns section of the vendor panel.
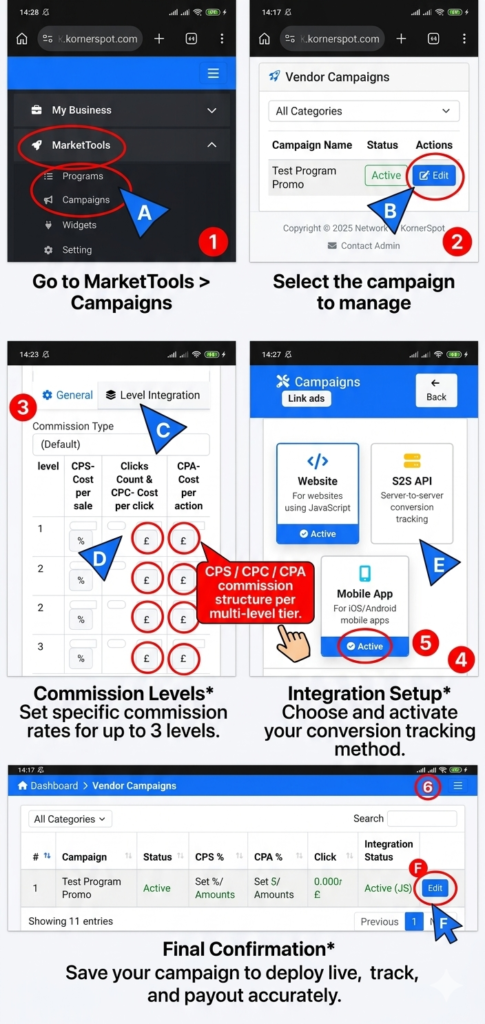
- Head on to MarketTools and Campaign as usual.
- Choose the specific campaign.
- Click on level settings to set commission levels.
- Click on Integration settings to set up integration tools
Step 9: Requesting a Funds Withdrawal
To move funds from your Vendor Wallet to your personal accounts:
- Action: When your wallet balance reaches the minimum withdrawal threshold, autowithdrawal becomes active. You can submit a payout request directly from your dashboard.
- Process: The request is mandatory to be reviewed and either approved or declined by the Admin (the same workflow as affiliates).